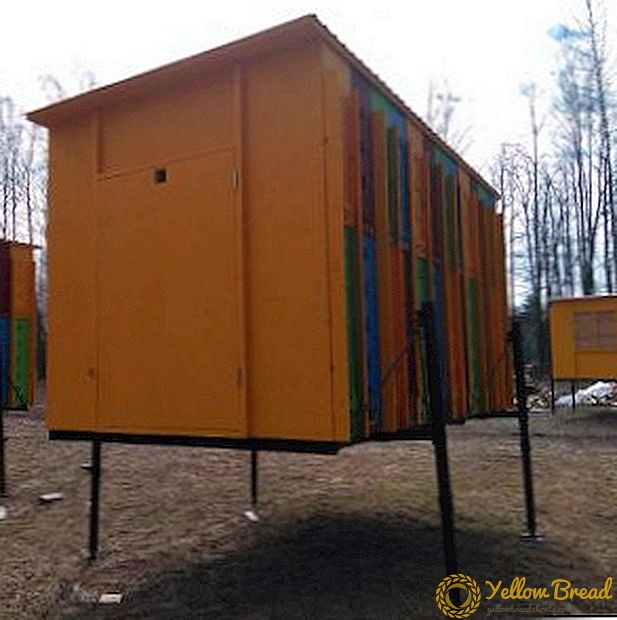
The “breadbasket” that is gaining popularity is a greenhouse, which is distinguished by its small size, ease of operation, and ease of installation.
You can collect it yourself if you follow simple guidelines.
- Description and equipment
- Choosing a place for a greenhouse
- Installation and installation
- Site preparation
- Frame assembly
- Sheathing
- Handle fastening
- Features of operation
- Advantages and disadvantages
- "Breadbasket" and "butterfly": the differences
Description and equipment
The greenhouse has a small size and is designed for growing in the initial stages of seedlings, greenery and root crops. This way is usually not suitable for tall plants, because the height of the greenhouse is small, and the shoots will simply begin to rest against the ceiling of the structure.
The dimensions of the frame of the greenhouse "breadbox" - 2.1 × 1.1 × 0.8 m. It provides for the use of cellular polycarbonate, whose thickness is 4 mm.  The frame is calculated so that it can withstand not only wind, but also snow loads. And the coating is made in such a way that you do not have to take it off for the winter.
- Butt - 2 pcs.
- Jumper - 4 pcs.
- Base - 2 pcs.
- Self-tapping screw roofing 4,2 * 19 - 60 pieces.
- Bolt m-5x40 - 12 pcs.
- Bolt m-5x60 - 2 pcs.
- Nut lamb M5 - 14 pcs.
Choosing a place for a greenhouse
It is very important to choose the right installation site, because otherwise there will be no benefit from the greenhouse. Pay attention to all the little things: the location of the cardinal points, nearby objects that can give shade, lighting, etc.
 For the greenhouse "breadbaskets" made of polycarbonate, the best fit area, near which there are no other buildings or small buildings. So you can achieve the maximum effect, because a large amount of light will fall on the greenhouse.
The distance to the nearest object that can give a shadow should be at least 5 mhowever, you yourself can count how far a particular structure can cast a shadow.
Installation and installation
So, when you have found a sunny place that is not obstructed by other buildings and which is located on a flat area, you can start building a greenhouse in the form of a breadbasket.  The best location for the design is, so that the opening side faces south. This way you will get more heat and light into the case.
Site preparation
You can put the design directly on the ground, but it is best to use the foundation. It can be made of brick or from logs, lumber, etc.
Creating the foundation on which the greenhouse will be located is the most difficult part. By itself, the assembly design is not so complicated.
Frame assembly
The assembly of the frame should be carried out on an already prepared base (for example, on a foundation) or simply on a flat surface. Connect all the base elements that were in the kit.This can be done with screws. Place the lower guides on the base first, then attach the ends to the guides on the opposite side.
All connections occur by inserting a pipe of small cross section into a pipe of large cross section. They are fastened to each other with bolts from the kit (M-5x40 mm).
After installing all these parts form the shape of the future roof. When you put all the parts together and make sure everything is in place, you can tighten the screws.
As you can see, the process is extremely simple: you can assemble a greenhouse using only a screwdriver.
Sheathing
To start trimming the greenhouse “breadbasket” made of polycarbonate, you need to prepare sheets: cut the polycarbonate sheets using a marker as shown in the diagram in the instructions.
Before cutting them, check all sizes again. You can cut the material and the usual sharply sharpened knife, but it is better to use jigsaw.
The sides of the outer cover should be mounted outside, and on the inside - inside.
Handle fastening
The fittings, in our case it is presented in the form of handles, is fastened last. It is necessary in order to easily open or close the greenhouse.  Attach to the cover of the handle, you can use screws. Be careful and choose really strong screws, otherwise they can be broken.
Features of operation
The greenhouse is considered universal for the cultivation of various crops. It can grow both flowers and seedlings. However, you should pay attention to the height of the planted plants - this is the only restriction. Most often, early specimens are grown in the breadbasket: radishes, tomatoes, cucumbers.
The collapsible greenhouse is designed for a snow load of no more than 30 kg per square meter. m (this is about 10 cm of snow), and the folding greenhouse - no more than 45 kg per square meter. In winter, make sure that no frost forms on the cover. It will prevent the snow from rolling down itself. If too much rain accumulates, the roof may not withstand the load.  In winter, you can also create additional support from metal or wood to reduce the risk of damage due to heavy loads. If you comply with all these operating conditions, then in the cold season you will not have to remove the cover with polycarbonate. Do not install the structure near buildings from which icicles and other sediments may fall.
In the summer, to clean the material, you need to take a damp cloth.This will be quite enough, and the use of additional chemicals is highly undesirable.
The obvious rule, however, requiring repetition is that you do not make fire inside. Do not do this and near the greenhouse, surrounded by 20 m.
It is often necessary to check how firmly the casing is attached to the base. If necessary, fasten it more.
Advantages and disadvantages
The first thing that catches the eye at the sight of the “breadbasket” is its compactness. Due to its small size, it can fit on any site.
Its construction is assembled in such a way that it is possible to work with plants without going inside, which means that it will not be possible to damage them by stepping on them.  In hot weather, both doors can be opened, and thus full ventilation will be provided. Plus, it is convenient to harvest from all sides.
However, some models cannot fully open. In this case, it will be difficult to care for all plants. But if you create a greenhouse yourself, then you can choose the angle of opening.
The streamlined shape will not allow the snow to linger on the roof in the cold season. It also prevents destructions during strong winds.
The materials from which the greenhouse is made, allow you to keep warm and maintain the optimum temperature inside not only in spring and summer, but also in autumn.
The design has a small weight, that is, if necessary, you can simply move it to another place, even without disassembling it.
Polycarbonate - the main material used - has a high light scattering ability, better than glass. Moreover, this material is much stronger than glass. However, compared to the same film, polycarbonate is a more expensive material.  If you construct a greenhouse incorrectly, then it will not be durable.
"Breadbasket" and "butterfly": the differences
The greenhouse "butterfly" is a popular substitute for "breadbasket", but they have a number of differences, which do not always allow us to consider them interchangeable.
First of all, the "breadbasket" has a lower cost compared to the "butterfly" and many other greenhouses. The described design has less weight, respectively, it is more mobile.
Breadbox displaces the "butterfly" and thanks to a simpler assembly plan. Different ways to open the lid. In the “bread box” at any location, they will create a cushion of warm greenhouse air.
If you carefully read the assembly instructions, view the drawings and drawings, then you will have no questions left, and the process of building the greenhouse will pass quickly and pleasantly.