 Biohumus is a very useful organic fertilizer that nourishes and restores nutrients in the soil, which allows you to grow large volumes and environmentally friendly crops. About what is included in this organic matter, how it differs from other fertilizers and how to make biohumus with your own hands, we will tell in this article.
- What is vermicompost and how to use it
- Choosing and buying worms for compost
- Composter design
- Compost preparation (nutrient substrate)
- Bookmark (release) worms in compost
- Care and conditions for keeping compost worms
- Sampling (department) of worms and biohumus
What is vermicompost and how to use it
Biohumus or vermicompost is a product of the processing of various organic agricultural waste by earthworms. This is how it differs from the same humus or compost, which are formed as a result of the action of various bacteria and microorganisms.
Biohumus has such characteristics as improving the structure of the soil and its water-physical properties. In addition, the concentration of nitrogen, phosphorus and potassium in it is somewhat higher than in other organics. The advantages of vermicompost are also:
- humus content from 10 to 15%;
- acidity pH 6.5-7.5;
- the absence of extraneous bacteria, weed seeds, salts of heavy metals;
- the presence of antibiotics and a large number of microorganisms that are involved in soil formation;
- more rapid development and more durable immunity in plants fed with this organic matter;
- valid for three to seven years.
Biohumus is well proven when using:
- for the prevention of plant diseases and their easy transfer of temperature drops;
- to accelerate the germination of seeds and to increase the number of shoots;
- to increase the volume and accelerate the ripening of the crop;
- for rapid recovery, restoration and improvement of soil fertility;
- to combat harmful insects (effect up to six months);
- to enhance the decorative appearance of flowers.
- planting and sowing of plants in open ground and in the greenhouse;
- top dressing of all types of agricultural plants;
- resuscitation and land reclamation;
- various forestry activities;
- fertilizing floral plants and growing lawn grasses.
 This organic fertilizer is used throughout the season: from early spring until the end of autumn.
Biohumus can be applied to any soil and in any quantities, the recommended application rate - 3-6 tons of dry fertilizer per 1 ha for large areas, for small - 500 g per 1 m².
Liquid solution for feeding and watering plants is prepared from 1 liter of vermicompost, which is diluted in 10 liters of warm water.
Biohumus is sold in finished form in granules and in liquid form (aqueous suspension).
- in the open area;
- in room.
Both in the first and in the second case it will be necessary to equip a special composter for breeding. Commercially used for this vermifabriki.
Read more about how to cook biohumus, read the following subsections. In general, this process consists of five stages:
- selection of the type and purchase of worms;
- composting;
- laying of animals in compost;
- care and feeding;
- extraction of worms and biohumus.

Choosing and buying worms for compost
Earthworms can be found and collected by themselves or purchased in the store. Most often, red Californian worms are used in vermicultivation (bred on the basis of manure in the 50s – 60s of the 20th century), however many companies also offer other types: prospector, manure, earthy, Dendroben Veneta (European worm for fishing).
Experienced manufacturers of vermicompost claim that the best of these species for vermicultivation are red Californian and a prospector. The first ones multiply well, live long (10-16 years), work fast, but their main disadvantage is low temperature intolerance.
 You can buy worms in specialized stores, including on the Internet, or in vermuschestvah. They are usually sold by families, at least 1500 pieces each, which include 10% of adults, 80% of children, and 10% of cocoons. When acquiring animals, it is necessary to pay attention to their mobility and body color.
Composter design
As we have already noted, vermicompost can be prepared both in the conditions of the summer cottage, and in the apartment or house. Any premises will do: garage, shed, basement. Some equip chervyatniki in the bathroom. The main thing - to build a composter or compost pit or a pile.
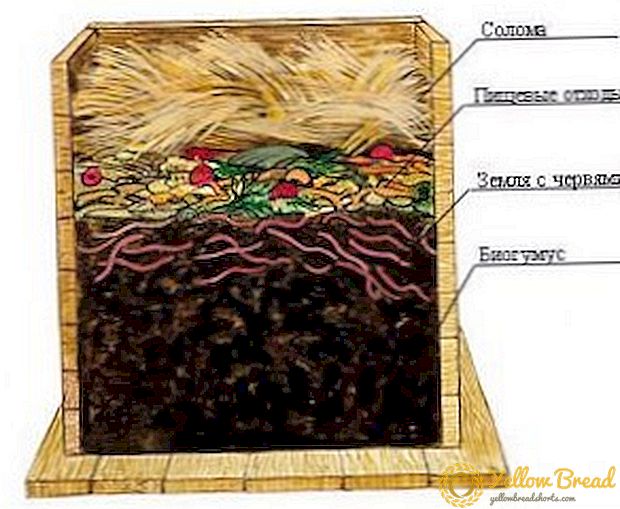
On the street, a house for worms is arranged in the form of a box of wooden boards without a bottom and a lid. The box must be placed in a place sheltered from the sun on the ground, in any case not on the concrete, because the excess water will need a way out.
Dimensions can be different, for example, 60-100 cm high, 1-1.3 m long and wide. In an apartment, a house for worms can also be built from a wooden or plastic box (container), or from cardboard -Under household appliances. For breeding worms fit large aquariums. You can use a plastic sieve, enclosed in a plastic basin or container.
Compost preparation (nutrient substrate)
For any species of worms, it will be necessary to prepare a nutrient substrate, which should consist of:
- manure or litter, food waste of plant origin, leaves, tops - one part;
- sand - 5%;
- hay (straw) or sawdust - one part.
Before being placed into the composter of worms, the substrate must undergo a special treatment - composting. It must be heated to the required temperature for several days. To do this, it is either simply heated in the sun (the desired temperature is easily achieved from April to September), or lime or peat (20 kg per 1 ton of raw material) is introduced into it.  Composting should last for 10 days. From the first to the third day, the temperature should be at +40 ° C, the next two days - at + 60 ... +70 ° C, from the seventh to the tenth day - + 20 ... +30 ° C.
After compost preparation, it should be tested by running several worms on the surface.If the animals have gone deep in a few minutes, then the compost is ready, if they are left on the surface, the substrate must still stand.
The optimum acidity of compost is 6.5-7.5 pH. With an increase in acidity above 9 pH, animals will die within seven days.
The optimum moisture content of the compost is 75-90% (will depend on the type of worms). At humidity below 35% during the week, animals may die.
The most suitable temperature for the vital activity of worms is + 20 ... +24 ° C, and at temperatures below -5 ° C and above +36 ° C the probability of their death is greatest. 
Bookmark (release) worms in compost
Worms are carefully laid out over the entire surface of the substrate in the composter. 750-1500 individuals should fall on each square meter.
Care and conditions for keeping compost worms
Substrate in the composter is subject to regular loosening and watering. Also worms need to be fed.
Loosening should be carried out twice a week using a stake or special forks for vermicompost. It is carried out to the entire depth of the substrate, but without mixing.
Water only with warm (+ 20 ... +24 ° C) and only separated water (at least three days). Chlorinated tap water can kill animals. Good for watering suitable rain or melt water. It is convenient to water with a watering can with small holes.
Check the humidity of the substrate, holding a small amount of it in a fist. A sufficiently moist substrate is one that, when compressed, is moisture, but not water droplets.  The first feeding of animals is carried out two or three days after the settlement. In the future, they need to be fed every two to three weeks. Vegetable food waste is poured in a uniform layer of 10-20 cm over the entire surface.Egg shells, potato peelings, watermelon peels, melons, banana peel, onion peel, etc. can be used for top dressing, only all waste should be chopped well.
Sampling (department) of worms and biohumus
Biohumus will be ready four to five months after the launch of the worms. When the box with worms and biohumus is completely full, animals and fertilizer will need to be removed.  To separate the worms, they are starved for three to four days. Then, on one third of the substrate area, a 5-7 cm layer of fresh food is laid out. Animals for some time will gather at this site. After a couple of days, the worms layer will need to be removed. For three weeks, this process is repeated three times.
Biohumus is a dark smearing mass that is collected and dried. Then sift with a sieve and packaged for storage. Its shelf life is 24 months when stored at a temperature of -20 to + 30 ° C.

