Having a country plot or a private house, of course, I want to not only work, but also enjoy the views and fruits of my labors. A table and a shop for giving your own hands will be an excellent option for arranging a garden.
- Wooden bench with backrest
- What you need to create
- Manufacturing process and drawings
- How to install the product
- How to make a bench around a tree, and what it takes
- Material and tool preparation
- Bench assembly
- How to make a transforming bench with your own hands
- What you need for a garden table
- Detailed instructions for making
- A log bench is a simple and unique design.
- Necessary tool
- Action list
Wooden bench with backrest
A wooden bench will be an inexpensive and practical element of decorating the area and will contribute to quality leisure activities.
What you need to create
 Before you build a bench, determine the place of its construction. Better to put it in the shade of a tree or a vineyard. To make a garden bench, you will need: wooden boards 30 mm thick and about 120 wide. Also not to do without wooden bars with a section of 40x40 mm.To connect the boards with each other you need 50 mm tapping screws. After complete assembly, you can paint the new bench with any colors that are used for external work.
To work, you will need the most common set of tools that every owner probably has:
- pencil;
- plane;
- hammer;
- roulette;
- screwdriver;
- hacksaw for wood;
- chisel.
Manufacturing process and drawings
To make a bench to give their own hands, you need to make drawings on which the bench will be built. First of all, determine the future height of the bench and the number of legs. There are generally accepted standards, which are recommended to adhere to: the width of the seat should be about half a meter, up to 600 mm long, the height of the back varies from 350-500 mm.
Having a finished drawing, it is already possible to determine how much material is needed for the bench. Also at that stage, decide what kind of plan the benches will be: transformer garden benches, portable, dug in, because the additional consumption of materials depends on this.
 Following the parameters of the drawing, you can easily make a bench. To begin to process the surface of the material, remove the notches. After that, cut the boards of the sizes you need. Using the jigsaw, you can cut the curly parts of the bench. Make holes for screws and fasten all the elements together.
How to install the product
Simple garden benches after assembly with their own hands can only be set. Even at the stage of creating a drawing, you had to determine whether the bench will be stationary or it can be transferred. In any case, you need to strengthen the design of the bench. To do this, screw the two beams to the front and rear sides of the bench. In the case of a shortage of material, you can use one beam, but install it transversely. After that, dig a bench into the ground if it was made for this.
How to make a bench around a tree, and what it takes
An excellent option would be to install a bench around a tree. So you will always enjoy the views of your garden from the shade and coolness of the tree.The easiest way is to buy a bench, but to make a bench for giving with your own hands, and after that it will be much more pleasant to spend evenings on it.
 First of all, you need to choose a tree, around which the bench will be located. At once it is worth making a reservation that for these purposes the young tree will not work. First, it looks ridiculous, and secondly, because of the growth of the tree in the future, problems will arise, and the tree will simply force out the shop.
Material and tool preparation
Given that the bench will always be under the open sky, you need to choose the right kind of tree, as it will be constantly exposed to the environment. For such a shop the ideal will be oak, pine, teak. Every detail of the future bench should be sanded and treated with an antiseptic solution, special oil or wood impregnation.Particular attention should be paid to the front side of the boards, since they account for the most moisture. After complete impregnation of wood, it should remain at least 15 hours.
It is important to prepare in advance all the necessary construction tools and materials. To create a bench around a tree, you will need:
- drill or screwdriver;
- hacksaw, circular saw or jigsaw;
- sandpaper or sanding machine;
- impregnation for wood;
- boards for supporting posts;
- boards for the bearing part;
- screws and bolts;
- If you want, prepare a paint or varnish for finishing work.
 The benches and benches for the dacha have a standard pattern from which you can make a start in making your own bench. For example, to make a square shop around a tree, seat height should be 50 cm (legs will reach to the ground), and the seat will be 45-50 cm wide.
Bench assembly
First of all, you need to assemble the support legs. There will be four of them and each will need 4 boards 10 cm wide, 60 long, and 2 boards 40 cm each. They need to be fastened with screws. After that, take 4 boards for each section. If the thickness of the trunk in the girth of about 160 cm, you will need to leave a distance of 15 cm from the crown, this means that the length of the board of the inner square will be equal to one meter.Based on these dimensions, the second bar should be 127 cm, the third - 154. The longest bar should be 180 cm.
It is necessary to fasten the short boards with screws or bolts to the supporting posts, leaving a gap of 2 cm, and attach the following strips in the same way.
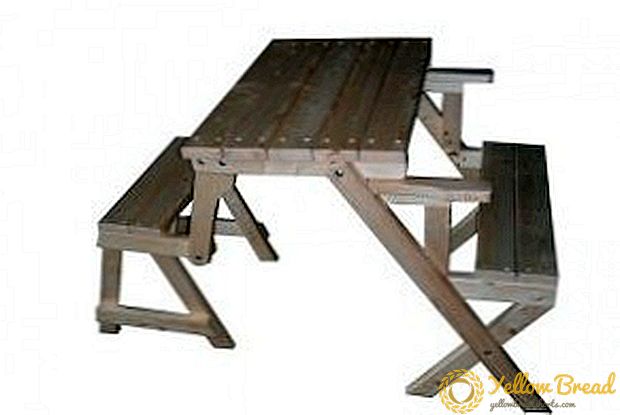
How to make a transforming bench with your own hands
 The transforming bench is a successful combination of practicality and beauty. These indicators are especially valued in the country or in a private house, where free space is often in short supply. A folded bench takes up very little space. With a flick of the wrist, you can get a folding country table with benches from an ordinary bench.
What you need for a garden table
To create such a bench you need a bar, it is best to use ash, beech, oak or birch.
To make it, you will need:
- hacksaw;
- roulette;
- sandpaper;
- chisel;
- bolts and nuts;
- drill.
Detailed instructions for making
The transformer bench dacha consists of benches with a back where the back turns to a table-top. Benches must be of different widths. All items need to be polished well. Instructions for manufacturing involves:
- To start legs are made. To make them, you need to cut 8 identical segments of a length of 70 cm. On each segment make oblique cuts both from above and below.
- After that you need make a frame under the bench. To do this, cut four 40 cm and four 170 cm segment. It is important to cut corners so that together we have 2 identical rectangles. For the connection using screws or nails.
- To finally form the seat, you need to make a frame reinforcing elements. To do this, nail a wooden bar in increments of 50 cm. Thanks to this, you will receive protection from deformation and separation into sections.
- Indent 10 centimeters from the corners, attach the legs to the seat. It is important to fasten immediately to 2-3 bolts, this will ensure maximum structural strength. In the bars in advance make grooves in which the bolt heads are hidden, and the excess parts of the nuts are cut with a hacksaw.
- Further the back is made or tabletop (this will depend on the position in which it will stand). From the timber you need to make a rectangle 70x170 cm, which is connected by stiffeners from the inside.
- Now you can combine the resulting components into one design. First you need to cut off the two bars of 40 cm in size. They are mounted between the bench and a large shield in the extreme corner points. You need to arrange them both on the bottom and on the side of the bench. Cut two more bars 110 cm long and fix them at the other bench. In this case, they are fastened not from the near side, but closer to the center, otherwise you will not be able to properly join the benches to each other.

A log bench is a simple and unique design.
The shop from a log strongly differs from analogs from other materials. It combines functionality as well as practicality. As the name implies, the basis for the bench is a log.
Necessary tool
To make a bench from a log, you need to cook: 
- chainsaw;
- ax;
- pencil;
- paint or varnish;
- compasses and schel.
- for the base you need a log;
- additional logs;
- board (back);
- posts.
Action list
The principle of operation is very simple. First of all, determine the place in which the bench will stand. Clean the main log from the knots and branches. Mark the places where the cuts will be made.
Using these instructions, you can build your own log benches and show them to your family.